
一、基础配置
hugo.yaml
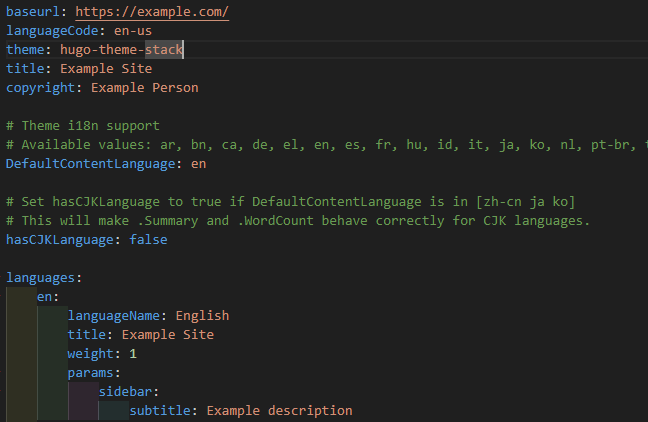
1baseurl: 网站根目录,部署后需要修改为你的实际网站地址/域名
2languageCode: 语言代码,默认值为en-us,可以修改为中文简体zh-cn
3theme: 主题名称,默认值为hugo-theme-stack
4title: 网站标题
5copyright: 版权所有者信息
6DefaultContentLanguage:默认内容语言,可修改为zh-cn
7hasCJKLanguage: 是否包含中文(影响字数统计)
8languages: 多语言设置
网站icon、时间格式、博客头像、License
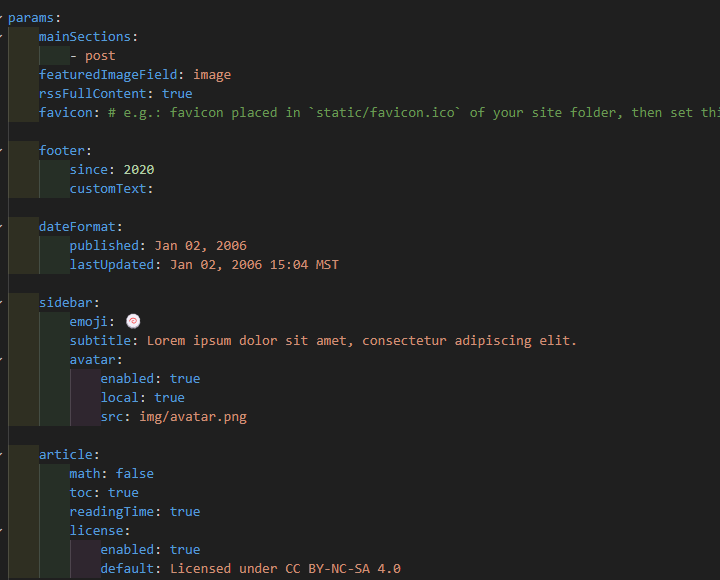
1favicon:网站icon,存储地址 /static/favicon.ico
2dateFormat: Go语言时间格式,2006不可以更改
3avatar: 博客头像,存储地址 /assets/img/avatar.png
4license: 公共版权许可协议声明
评论系统
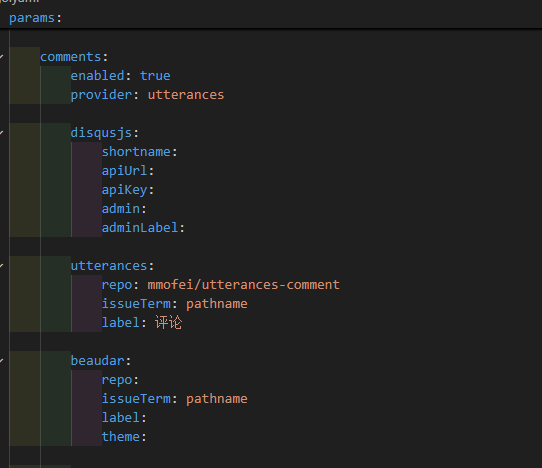
目前使用的是 utterances 评论系统,参考了 Hugo博客使用utterances作为评论系统
社交功能
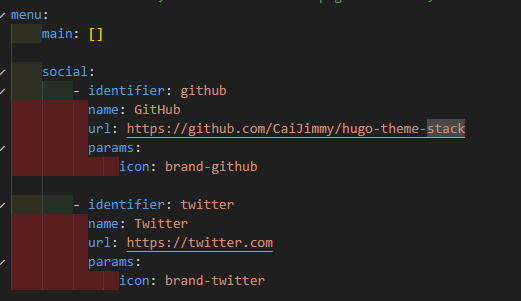
- 添加个人社交平台的链接
- icon路径:站点目录下的
/assets/icons,所有用到的icon都放在这里,格式为.svg
二、个性化修改
整体布局
参考文章:
1.将要修改的文件复制到站点目录下,然后开始个性化修改
2.没有目录的自己创建一个同名目录
一些细节
左侧栏ID修改
在layouts\partials\sidebar\left.html中找到以下代码:
1        <div class="site-meta">
2            <h1 class="site-name"><a href="{{ .Site.BaseURL | relLangURL }}">{{ .Site.Title }}</a></h1>
3            <h2 class="site-description">{{ .Site.Params.sidebar.subtitle }}</h2>
4        </div>
修改为:
1        <div class="site-meta">
2            <h1 class="site-name"><a href="{{ .Site.BaseURL | relLangURL }}"><span>Mofei</span></a></h1>
3             <h2 class="site-description">{{ .Site.Params.sidebar.subtitle }}</h2>
4        </div>
字体修改
原来的字体看着有点别扭,所以把全站的字体改为了思源宋体,参考了 Hugo|月球基地开发历程 中的修改全站字体
在layouts/partials/head/custom.html(没有就新建或者在主题目录下修改)中添加下列代码:
 1<style>
 2  :root {
 3    --sys-font-family: "Noto Serif SC";
 4    --zh-font-family: "Noto Serif SC";
 5    --base-font-family: "Noto Serif SC";
 6    --code-font-family: "Noto Serif SC";
 7    --article-font-family: "Noto Serif SC";
 8  }
 9</style>
10
11<script>
12  (function () {
13    const customFont = document.createElement("link");
14    customFont.href =
15      "https://fonts.googleapis.com/css2?family=Noto+Serif+SC:wght@400;700&display=swap";
16
17    customFont.type = "text/css";
18    customFont.rel = "stylesheet";
19
20    document.head.appendChild(customFont);
21  })();
22</script>
汉语和英语之间自动添加空格
在主题目录中的layouts/partials/footer/footer.html中写入以下内容:
 1<script>
 2    (function(u, c) {
 3      var d = document, t = 'script', o = d.createElement(t),
 4          s = d.getElementsByTagName(t)[0];
 5      o.src = u;
 6      if (c) { o.addEventListener('load', function(e) { c(e); }); }
 7      s.parentNode.insertBefore(o, s);
 8    })('//cdn.bootcss.com/pangu/4.0.7/pangu.min.js', function() {
 9      pangu.spacingPage();
10    });
11</script>
给博客添加heatmap
代码来源: hugostack装修
页面加载进度条
layouts\partials\footer\custom.html添加以下代码:
 1<!-- 页面加载进度条显示 -->
 2<!-- layouts/partials/footer/custom.html -->
 3<script
 4    src="https://cdn.jsdelivr.net/gh/zhixuan2333/gh-blog@v0.1.0/js/nprogress.min.js"
 5    integrity="sha384-bHDlAEUFxsRI7JfULv3DTpL2IXbbgn4JHQJibgo5iiXSK6Iu8muwqHANhun74Cqg"
 6    crossorigin="anonymous"
 7></script>
 8<link
 9    rel="stylesheet"
10    href="https://cdn.jsdelivr.net/gh/zhixuan2333/gh-blog@v0.1.0/css/nprogress.css"
11    integrity="sha384-KJyhr2syt5+4M9Pz5dipCvTrtvOmLk/olWVdfhAp858UCa64Ia5GFpTN7+G4BWpE"
12    crossorigin="anonymous"
13/>
14<script>
15    NProgress.start();
16    document.addEventListener("readystatechange", () => {
17        if (document.readyState === "interactive") NProgress.inc(0.8);
18        if (document.readyState === "complete") NProgress.done();
19    });
20</script>
看板娘
参考教程: 【Hugo】博客引入moc3类型的live2d模型
目前用了这个博主的看板娘,后续会继续摸索做自己的看板娘
鼠标点击特效
在layouts\partials\footer\文件夹下新建 mouse-click.html文件,写入以下代码:
 1<!-- 鼠标点击特效 -->
 2<script type="text/javascript">
 3    ! function (e, t, a) {
 4        function r() {
 5            for (var e = 0; e < s.length; e++) s[e].alpha <= 0 ? (t.body.removeChild(s[e].el), s.splice(e, 1)) : (s[
 6                    e].y--, s[e].scale += .004, s[e].alpha -= .013, s[e].el.style.cssText = "left:" + s[e].x +
 7                "px;top:" + s[e].y + "px;opacity:" + s[e].alpha + ";transform:scale(" + s[e].scale + "," + s[e]
 8                .scale + ") rotate(45deg);background:" + s[e].color + ";z-index:99999");
 9            requestAnimationFrame(r)
10        }
11
12        function n() {
13            var t = "function" == typeof e.onclick && e.onclick;
14            e.onclick = function (e) {
15                t && t(), o(e)
16            }
17        }
18
19        function o(e) {
20            var a = t.createElement("div");
21            a.className = "heart", s.push({
22                el: a,
23                x: e.clientX - 5,
24                y: e.clientY - 5,
25                scale: 1,
26                alpha: 1,
27                color: c()
28            }), t.body.appendChild(a)
29        }
30
31        function i(e) {
32            var a = t.createElement("style");
33            a.type = "text/css";
34            try {
35                a.appendChild(t.createTextNode(e))
36            } catch (t) {
37                a.styleSheet.cssText = e
38            }
39            t.getElementsByTagName("head")[0].appendChild(a)
40        }
41
42        function c() {
43            return "rgb(" + ~~(255 * Math.random()) + "," + ~~(255 * Math.random()) + "," + ~~(255 * Math
44                .random()) + ")"
45        }
46        var s = [];
47        e.requestAnimationFrame = e.requestAnimationFrame || e.webkitRequestAnimationFrame || e
48            .mozRequestAnimationFrame || e.oRequestAnimationFrame || e.msRequestAnimationFrame || function (e) {
49                setTimeout(e, 1e3 / 60)
50            }, i(
51                ".heart{width: 10px;height: 10px;position: fixed;background: #f00;transform: rotate(45deg);-webkit-transform: rotate(45deg);-moz-transform: rotate(45deg);}.heart:after,.heart:before{content: '';width: inherit;height: inherit;background: inherit;border-radius: 50%;-webkit-border-radius: 50%;-moz-border-radius: 50%;position: fixed;}.heart:after{top: -5px;}.heart:before{left: -5px;}"
52            ), n(), r()
53    }(window, document);
54</script>
然后再在layouts\_default\baseof.html中的{{ partial "footer/include.html" . }}下添加以下代码:
1{{ partial "footer/mouse-click.html" . }}
鼠标轨迹蜘蛛特效
单独的背景有点单调,感觉添加一些线条更有灵动的美感
原代码(我放到了上面创建的mouse-click.html里,也可以单独创建文件夹或者直接放到baseof.html中):
 1<style>
 2!function () {
 3    function n(n, e, t) {
 4        return n.getAttribute(e) || t
 5    }
 6
 7    function e(n) {
 8        return document.getElementsByTagName(n)
 9    }
10
11    function t() {
12        var t = e("script"), o = t.length, i = t[o - 1];
13        return {l: o, z: n(i, "zIndex", -1), o: n(i, "opacity", .5), c: n(i, "color", "0,0,0"), n: n(i, "count", 99)}
14    }
15
16    function o() {
17        a = m.width = window.innerWidth || document.documentElement.clientWidth || document.body.clientWidth, c = m.height = window.innerHeight || document.documentElement.clientHeight || document.body.clientHeight
18    }
19
20    function i() {
21        r.clearRect(0, 0, a, c);
22        var n, e, t, o, m, l;
23        s.forEach(function (i, x) {
24            for (i.x += i.xa, i.y += i.ya, i.xa *= i.x > a || i.x < 0 ? -1 : 1, i.ya *= i.y > c || i.y < 0 ? -1 : 1, r.fillRect(i.x - .5, i.y - .5, 1, 1), e = x + 1; e < u.length; e++) n = u[e], null !== n.x && null !== n.y && (o = i.x - n.x, m = i.y - n.y, l = o * o + m * m, l < n.max && (n === y && l >= n.max / 2 && (i.x -= .03 * o, i.y -= .03 * m), t = (n.max - l) / n.max, r.beginPath(), r.lineWidth = t / 2, r.strokeStyle = "rgba(" + d.c + "," + (t + .2) + ")", r.moveTo(i.x, i.y), r.lineTo(n.x, n.y), r.stroke()))
25        }), x(i)
26    }
27
28    var a, c, u, m = document.createElement("canvas"), d = t(), l = "c_n" + d.l, r = m.getContext("2d"),
29        x = window.requestAnimationFrame || window.webkitRequestAnimationFrame || window.mozRequestAnimationFrame || window.oRequestAnimationFrame || window.msRequestAnimationFrame || function (n) {
30            window.setTimeout(n, 1e3 / 45)
31        }, w = Math.random, y = {x: null, y: null, max: 2e4};
32    m.id = l, m.style.cssText = "position:fixed;top:0;left:0;z-index:" + d.z + ";opacity:" + d.o, e("body")[0].appendChild(m), o(), window.onresize = o, window.onmousemove = function (n) {
33        n = n || window.event, y.x = n.clientX, y.y = n.clientY
34    }, window.onmouseout = function () {
35        y.x = null, y.y = null
36    };
37    for (var s = [], f = 0; d.n > f; f++) {
38        var h = w() * a, g = w() * c, v = 2 * w() - 1, p = 2 * w() - 1;
39        s.push({x: h, y: g, xa: v, ya: p, max: 6e3})
40    }
41    u = s.concat([y]), setTimeout(function () {
42        i()
43    }, 100)
44}();
45</style>
下面这段代码中的color可以更改蛛丝的颜色(rgb格式)
1function t() {
2        var t = e("script"), o = t.length, i = t[o - 1];
3        return {l: o, z: n(i, "zIndex", -1), o: n(i, "opacity", .5), c: n(i, "color", "0,0,0"), n: n(i, "count", 99)}
4}
由于我添加了背景图片,所以对代码做了一些修改,修改后的代码为:
  1<!-- 鼠标蜘蛛网特效 -->
  2<script>
  3    !function () {
  4        // 1. 获取配置与颜色
  5        function getConfig() {
  6            var isDark = document.body.getAttribute('data-scheme') === 'dark';
  7            // 深色模式:淡蓝色 (173, 216, 230);浅色模式:深灰色/蓝色 (50, 50, 50)
  8            var colorRGB = isDark ? "173, 216, 230" : "100, 100, 100";
  9            return {
 10                zIndex: -1,      // 层级
 11                opacity: 0.6,    // 透明度
 12                color: colorRGB, // 颜色
 13                count: 80,       // 粒子数量 (太多会卡,太少不明显)
 14                distance: 150    // 连线最大距离
 15            };
 16        }
 17
 18        var config = getConfig();
 19        var canvas = document.createElement("canvas");
 20        var ctx = canvas.getContext("2d");
 21        var width, height;
 22        var particles = [];
 23
 24        // 鼠标对象
 25        var mouse = { x: null, y: null, maxDistance: config.distance * config.distance };
 26
 27        // 初始化 Canvas
 28        canvas.style.cssText = "position:fixed;top:0;left:0;z-index:" + config.zIndex + ";opacity:" + config.opacity + ";pointer-events:none;"; // pointer-events:none 确保不阻挡点击
 29        document.body.appendChild(canvas);
 30
 31        // 调整大小
 32        function resize() {
 33            width = canvas.width = window.innerWidth;
 34            height = canvas.height = window.innerHeight;
 35        }
 36        window.addEventListener('resize', resize);
 37        resize();
 38
 39        // 粒子类
 40        class Particle {
 41            constructor() {
 42                this.x = Math.random() * width;
 43                this.y = Math.random() * height;
 44                this.vx = (Math.random() - 0.5) * 1.5; // 速度稍快一点
 45                this.vy = (Math.random() - 0.5) * 1.5;
 46                this.size = Math.random() * 2 + 1;
 47            }
 48
 49            update() {
 50                this.x += this.vx;
 51                this.y += this.vy;
 52
 53                // 边界反弹
 54                if (this.x < 0 || this.x > width) this.vx *= -1;
 55                if (this.y < 0 || this.y > height) this.vy *= -1;
 56
 57                // 鼠标互动:如果鼠标在附近,稍微被吸引
 58                if (mouse.x != null) {
 59                    var dx = mouse.x - this.x;
 60                    var dy = mouse.y - this.y;
 61                    var distance = Math.sqrt(dx*dx + dy*dy);
 62                    if (distance < 200) {
 63                        var forceDirectionX = dx / distance;
 64                        var forceDirectionY = dy / distance;
 65                        var force = (200 - distance) / 200;
 66                        var directionX = forceDirectionX * force * 0.5; // 吸引力强度
 67                        var directionY = forceDirectionY * force * 0.5;
 68                        this.x += directionX;
 69                        this.y += directionY;
 70                    }
 71                }
 72            }
 73
 74            draw() {
 75                ctx.beginPath();
 76                ctx.arc(this.x, this.y, this.size, 0, Math.PI * 2);
 77                ctx.fillStyle = "rgba(" + config.color + ", 0.5)";
 78                ctx.fill();
 79            }
 80        }
 81
 82        // 初始化粒子
 83        function initParticles() {
 84            particles = [];
 85            for (var i = 0; i < config.count; i++) {
 86                particles.push(new Particle());
 87            }
 88        }
 89
 90        // 动画循环
 91        function animate() {
 92            ctx.clearRect(0, 0, width, height);
 93
 94            for (var i = 0; i < particles.length; i++) {
 95                particles[i].update();
 96                particles[i].draw();
 97
 98                // 绘制连线
 99                for (var j = i; j < particles.length; j++) {
100                    var dx = particles[i].x - particles[j].x;
101                    var dy = particles[i].y - particles[j].y;
102                    var distance = dx*dx + dy*dy;
103
104                    if (distance < mouse.maxDistance) {
105                        ctx.beginPath();
106                        // 距离越近线越粗/越不透明
107                        var opacity = 1 - (distance / mouse.maxDistance);
108                        ctx.strokeStyle = "rgba(" + config.color + "," + opacity + ")";
109                        ctx.lineWidth = 1;
110                        ctx.moveTo(particles[i].x, particles[i].y);
111                        ctx.lineTo(particles[j].x, particles[j].y);
112                        ctx.stroke();
113                    }
114                }
115
116                // 绘制鼠标连线
117                if (mouse.x != null) {
118                    var dx = particles[i].x - mouse.x;
119                    var dy = particles[i].y - mouse.y;
120                    var distance = dx*dx + dy*dy;
121                    if (distance < mouse.maxDistance) {
122                        ctx.beginPath();
123                        var opacity = 1 - (distance / mouse.maxDistance);
124                        ctx.strokeStyle = "rgba(" + config.color + "," + opacity + ")";
125                        ctx.lineWidth = 1.5; // 鼠标连线稍粗
126                        ctx.moveTo(particles[i].x, particles[i].y);
127                        ctx.lineTo(mouse.x, mouse.y);
128                        ctx.stroke();
129                    }
130                }
131            }
132            requestAnimationFrame(animate);
133        }
134
135        // 监听鼠标
136        window.addEventListener('mousemove', function(e) {
137            mouse.x = e.x;
138            mouse.y = e.y;
139        });
140
141        window.addEventListener('mouseout', function() {
142            mouse.x = null;
143            mouse.y = null;
144        });
145
146        // 监听主题切换以更新颜色
147        var observer = new MutationObserver(function(mutations) {
148            mutations.forEach(function(mutation) {
149                if (mutation.attributeName === 'data-scheme') {
150                    config = getConfig();
151                    mouse.maxDistance = config.distance * config.distance;
152                }
153            });
154        });
155        observer.observe(document.body, { attributes: true, attributeFilter: ['data-scheme'] });
156
157        initParticles();
158        animate();
159    }();
160</script>
下面这段代码可以按自己的喜好修改蛛丝的效果,颜色可跟随主题的明暗变化修改,需要rgb值。
 1        function getConfig() {
 2            var isDark = document.body.getAttribute('data-scheme') === 'dark';
 3            // 深色模式:淡蓝色 (173, 216, 230);浅色模式:深灰色/蓝色 (50, 50, 50)
 4            var colorRGB = isDark ? "173, 216, 230" : "100, 100, 100";
 5            return {
 6                zIndex: -1,      // 层级
 7                opacity: 0.6,    // 透明度
 8                color: colorRGB, // 颜色
 9                count: 80,       // 粒子数量 (太多会卡,太少不明显)
10                distance: 150    // 连线最大距离
11            };
12        }
小巧思 | Shortcoeds
整理了一些有趣的短代码,归档整理一下,便于使用~
1️⃣animated-text 动态文字
代码 :
 1#layouts\shortcodes\animated-text.html(没有就新建,做了明暗主题适配,可自定义颜色)
 2{{ $text := .Get "text" | default "L a p h e l" }}
 3{{ $align := .Get "align" | default "center" }}
 4{{ $fontSize := .Get "font-size" | default "90" }}
 5
 6<!-- 定义 CSS 变量,根据主题切换颜色 -->
 7<style>
 8  :root {
 9    /*
10       明亮模式配色:护眼莫兰迪黄绿系
11       特点:低饱和度,低对比度,柔和自然
12    */
13    --stroke-color-1: #6b8c70; /* 灰橄榄绿 */
14    --stroke-color-2: #8da386; /* 鼠尾草绿 */
15    --stroke-color-3: #b8c99e; /* 淡芽绿 */
16    --stroke-color-4: #579b1b; /* 米白绿 (高光) */
17  }
18
19  /*
20     暗色模式配色:保持之前的霓虹/荧光感
21     因为暗色模式下需要高亮度才能看清,所以保留高饱和度
22  */
23  [data-scheme="dark"] {
24    --stroke-color-1: #2e4a2e;
25    --stroke-color-2: #558b2f;
26    --stroke-color-3: #76b041;
27    --stroke-color-4: #ccff00;
28  }
29</style>
30
31<div class="" style="text-align: {{ $align }}; width: 100%; max-width: 100%;">
32  <svg xmlns="http://www.w3.org/2000/svg" class="name" font-size="{{ $fontSize }}" viewBox="0 0 1000 200" preserveAspectRatio="xMidYMid meet">
33    {{ $textAnchor := "middle" }}
34    {{ $xPosition := "50%" }}
35    {{ if eq $align "left" }}
36      {{ $textAnchor = "start" }}
37      {{ $xPosition = "0%" }}
38    {{ else if eq $align "right" }}
39      {{ $textAnchor = "end" }}
40      {{ $xPosition = "100%" }}
41    {{ end }}
42
43    <!-- 第一层:基础轮廓色 -->
44    <text text-anchor="{{ $textAnchor }}" x="{{ $xPosition }}" y="66%" text-transform="uppercase" fill="none" stroke="var(--stroke-color-1)" stroke-width="1px" stroke-dasharray="90 310">
45      {{ $text }}
46      <animate attributeName="stroke-dashoffset" begin="-1.5s" dur="6s" from="0" to="-400" repeatCount="indefinite"></animate>
47    </text>
48
49    <!-- 第二层:过渡色 -->
50    <text text-anchor="{{ $textAnchor }}" x="{{ $xPosition }}" y="66%" text-transform="uppercase" fill="none" stroke="var(--stroke-color-2)" stroke-width="1px" stroke-dasharray="90 310">
51      {{ $text }}
52      <animate attributeName="stroke-dashoffset" begin="-3s" dur="6s" from="0" to="-400" repeatCount="indefinite"></animate>
53    </text>
54
55    <!-- 第三层:亮色 -->
56    <text text-anchor="{{ $textAnchor }}" x="{{ $xPosition }}" y="66%" text-transform="uppercase" fill="none" stroke="var(--stroke-color-3)" stroke-width="1px" stroke-dasharray="90 310">
57      {{ $text }}
58      <animate attributeName="stroke-dashoffset" begin="-4.5s" dur="6s" from="0" to="-400" repeatCount="indefinite"></animate>
59    </text>
60
61    <!-- 第四层:高光/柔和色 -->
62    <text text-anchor="{{ $textAnchor }}" x="{{ $xPosition }}" y="66%" text-transform="uppercase" fill="none" stroke="var(--stroke-color-4)" stroke-width="1px" stroke-dasharray="90 310">
63      {{ $text }}
64      <animate attributeName="stroke-dashoffset" begin="-6s" dur="6s" from="0" to="-400" repeatCount="indefinite"></animate>
65    </text>
66  </svg>
67</div>
使用方式:
1{< animated-text text="Hugo Stack" font-size=""> align="">}
2# align="left" | "right" | "center" 默认center
3# font-size 按自己的需求填写,默认90px
4# 使用的时候要用{{ }}
2️⃣ 重点标记
Hugo Stack代码:
- html
1#layouts\shortcodes\mark.html(没有就新建)
2<mark>{{ .Get "text" }}</mark>
- css
1#assets\scss\custom.scss
2mark{
3    background: hsla(165, 64%, 63%, 0.696);
4}
使用方式:
1{< mark text="Hugo Stack" >}//实际为{{ }}
3️⃣ 文本折叠
叠叠叠叠
“嘿,兄弟,我们好久不见你在哪里;嘿,朋友,如果真的是你请打招呼……
“爱情,是激情和柔情的混合体,是超脱于理智之外的感情。”
代码:
1#layouts\shortcodes\detail.html
2<details>
3    <summary>{{ (.Get 0) | markdownify }}</summary>
4    {{ .Inner | markdownify }}
5</details>
使用:
1{< detail "叠叠乐" >} // 实际 {{ }}
2<p>“嘿,兄弟,我们好久不见你在哪里;嘿,朋友,如果真的是你请打招呼……</p>
3
4<p>“爱情,是激情和柔情的混合体,是超脱于理智之外的感情。”</p>
5{< /detail >} //实际 {{ }}
4️⃣ 文本高斯模糊
谁是七侠镇一妈啊?
换行加空标签
代码:
 1#assets\scss\custom.scss
 2.blur {
 3    color: transparent;
 4    text-shadow:0px 0px 8px var(--card-text-color-main)
 5}
 6
 7.blur:hover {
 8    color: transparent;
 9    text-shadow:0px 0px 0px var(--card-text-color-main)
10
11}
使用:
1<span class="blur">谁是七侠镇一妈啊?<br>换行加空标签</span>
5️⃣ 文字渐变
这世界有太多不如意,
可是你的生活还是要继续。
太阳每天依旧要升起,希望永远种在你心里。
代码:
1//文字颜色渐变
2.colorfulfont {
3    background: linear-gradient(to right, rgb(25, 221, 238), #ed4588); //第一个颜色代码是渐变起始色,第二个颜色代码是渐变结束色;
4    -webkit-background-clip: text;
5    background-clip: text;
6    color: transparent;
7}
使用:
1<font class="colorfulfont"> 这世界有太多不如意,<br>可是你的生活还是要继续。<br> 太阳每天依旧要升起,希望永远种在你心里。</font>
6️⃣ 文本位置
文字居左
文字居中
文字居右
代码:
- html
1layouts\shortcodes\align.html
2<p style="text-align:{{ index .Params 0 }}">{{ index .Params 1 | markdownify }}</p>
使用:
1{< align left "文字居左" >}
2{< align center "文字居中" >}
3{< align right "文字居右" >}
4//实际使用记得换成双括号。
7️⃣ 摘录引用
“感觉只是一瞬间的事,感情才是一辈子的事”
代码:
 1#layouts\shortcodes\quote.html
 2<!-- reset scratch variables at the start -->
 3{{ $.Scratch.Set "bl_author" false }}
 4{{ $.Scratch.Set "bl_source" false }}
 5{{ $.Scratch.Set "bl_link" false }}
 6{{ $.Scratch.Set "bl_title" false }}
 7
 8{{ if .IsNamedParams }}
 9  {{ $.Scratch.Set "bl_author" (.Get "author") }}
10  {{ $.Scratch.Set "bl_source" (.Get "source") }}
11  {{ $.Scratch.Set "bl_link" (.Get "link") }}
12  {{ $.Scratch.Set "bl_title" (.Get "title") }}
13{{ else }}
14  <!-- for the positional version if any -->
15{{ end }}
16
17<!-- if title is not set explicitly then we need to beautify the link
18     if length of link is more than 32 chars, we will cut it off by 32 and
19     then drop everything after the last / if any and put it in into title -->
20
21{{ with $.Scratch.Get "bl_title" }}
22  <!-- do nothing -->
23{{ else }}
24  {{ with $.Scratch.Get "bl_link" }}    <!-- if link is given -->
25    {{ range last 1 (split ($.Scratch.Get "bl_link" ) "://") }}  <!-- split by :// and then only take the items after it to remove protocol:// -->
26      {{ $.Scratch.Set "title_without_protocol" . }}
27    {{ end }}
28    {{ range last 1 (split ($.Scratch.Get "title_without_protocol" ) "www.")  }} <!-- also remove the www. at the start if any. we are using a second split because all URLS may not start with it -->
29      {{ $.Scratch.Set "title_without_protocol" . }}
30    {{ end }}
31    {{ $.Scratch.Set "bl_title" ($.Scratch.Get "title_without_protocol") }}
32
33    <!-- if link is longer than 32 bytes we should trim it -->
34    {{ if (gt (len ($.Scratch.Get "title_without_protocol") ) 32) }}
35      {{ $title := (slicestr ($.Scratch.Get "title_without_protocol") 0 32) }}   <!-- get the first 32 characters of title_without_protocol -->
36      {{ $split_by_fw_slash := split $title "/" }}   <!-- now split on / because we want to stop after the last forward slash -->
37      {{ $count := (sub (len $split_by_fw_slash) 1) }}   <!-- we want everything but the last part so we adjust the count accordingly -->
38
39      {{ $.Scratch.Set "tempstring" "" }}   <!-- temp variable to hold the concatinated string -->
40      {{ range first $count $split_by_fw_slash  }}  <!-- loop through all parts except last and concat them (add / between halves) -->
41        {{ $.Scratch.Set "tempstring" ( . | printf "%s%s/" ($.Scratch.Get "tempstring") | printf "%s" ) }}
42      {{ end }}
43      {{ $.Scratch.Set "bl_title" ( printf "%s..." ($.Scratch.Get "tempstring") | printf "%s" ) }}
44    {{ end }}
45  {{ end }}
46{{ end }}
47
48<blockquote>
49  <p>{{ .Inner | markdownify }}</p>
50  <footer style="text-align:right">
51    <strong>{{ with $.Scratch.Get "bl_author" }}{{ . }}{{ end }}</strong>
52    {{ with $.Scratch.Get "bl_source" }}
53      <cite>{{ . }}</cite>
54    {{ else }}
55      {{ with $.Scratch.Get "bl_link" }}
56        <cite>
57          <a href="{{ . }}" title="{{ . }}" rel="noopener noreferrer">{{ $.Scratch.Get "bl_title" }}</a> <!-- can't have new lines here -->
58        </cite>
59      {{ else }}
60        {{ with $.Scratch.Get "bl_title" }}
61          <cite>
62            {{ $.Scratch.Get "bl_title" }}</a>
63          </cite>
64        {{ end }}
65      {{ end }}
66    {{ end }}
67  </footer>
68</blockquote>
使用:
1{< quote author="作者" link="可不加" title="作品名" >}
2这里写引用内容,实际使用记得换成双括号。
3{< /quote >}
8️⃣ 居中引用
我生从何来?
死往何处?
我为何要出现在这个世界上?
代码:
- html
1#layouts\shortcodes\quote-center.html
2{{- $content := .Inner | markdownify -}}
3
4<blockquote class="quote-center">
5    {{- $content | safeHTML -}}
6</blockquote>
- css
 1#assets\scss\custom.scss
 2// 居中引用格式
 3blockquote.quote-center {
 4  position: relative;
 5  border: none;
 6  padding: 2rem 0;
 7  text-align: center; // 直接在这里居中,继承给子元素
 8
 9  p {
10    margin: 0;
11    position: relative;
12    z-index: 1; // 确保文字在装饰线之上
13  }
14
15  &::before,
16  &::after {
17    position: absolute;
18    top: 50%;
19    transform: translateY(-50%); // 垂直居中
20    font-size: 2rem;
21    color: #6496c880;
22    width: 30%; // 限制装饰线宽度
23    height: 1px;
24    background: #6496c880; // 使用背景色画线,比 content 更可控
25    content: '';
26  }
27
28  &::before {
29    left: 0;
30    background: linear-gradient(to right, transparent, #6496c880);
31  }
32
33  &::after {
34    right: 0;
35    background: linear-gradient(to left, transparent, #6496c880);
36  }
37
38  // 如果还要加引号
39  .quote-icon {
40      font-size: 3em;
41      color: #6496c880;
42      display: block;
43      margin-bottom: 10px;
44  }
45}
使用:
1{< quote-center >}
2我生从何来?<br>死往何处?<br>我为何要出现在这个世界上?
3{< /quote-center >}
4//实际是 {{ }}
9️⃣ 仿Github样式
代码:
- html
 1<div class="github">
 2    <div class="logo">
 3        {{ replace $.Site.Data.SVG.repository "icon" "icon github-icon" | safeHTML }}
 4        <a class="name" href={{ .Get "link" }} target="_blank">{{ .Get "name" }}</a>
 5    </div>
 6    <div class="description">{{ .Get "description" }}</div>
 7    <div class="language">
 8        <span class="language-color" style="background-color: {{ .Get "color" }}"></span>
 9        <span class="language-name">{{ .Get "language" }}</span>
10    </div>
11</div>
- css
 1//github样式
 2.github {
 3    border: 1px solid var(--card-text-color-main);
 4    border-radius: 3px;
 5    margin: 0 auto;
 6    margin-bottom: 1em;
 7    padding: 1em;
 8    .github-icon {
 9      width: 1.2em;
10      height: 1.2em;
11      margin-right: 0.5em;
12      margin-bottom: 0.2em;
13      fill: var(--card-text-color-main);
14      transition: all 0.5s;
15    }
16    .name {
17      font-weight: bold;
18      color: #2e97d9;
19      text-decoration: underline;
20      margin-left: 0.5em;
21      position: relative;
22      top: -5px; //加这个属性是因为我的图标和名称无法对齐,实际使用的时候要根据自己的网站修改
23    }
24    .description {
25      margin-top: 0.5em;
26      margin-bottom: 0.5em;
27      color: var(--card-text-color-main);
28      text-align: justify;
29      font-size: 90%;
30      transition: all 0.5s;
31    }
32    .language-color {
33      position: relative;
34      top: 1px;
35      display: inline-block;
36      width: 0.75em;
37      height: 0.75em;
38      border-radius: 50%;
39    }
40    .language-name {
41      color: var(--card-text-color-main);
42      font-size: 90%;
43      margin-left: 0.5em;
44      transition: all 0.5s;
45    }
46}
图标(Github原始图标,可替换):
1# data\SVG.toml
2repository = '<svg xmlns="http://www.w3.org/2000/svg" class="icon" viewBox="0 0 16 16"><path fill-rule="evenodd" clip-rule="evenodd" d="M2 2.5C2 1.83696 2.26339 1.20107 2.73223 0.732233C3.20108 0.263392 3.83696 0 4.5 0L13.25 0C13.4489 0 13.6397 0.0790176 13.7803 0.21967C13.921 0.360322 14 0.551088 14 0.75V13.25C14 13.4489 13.921 13.6397 13.7803 13.7803C13.6397 13.921 13.4489 14 13.25 14H10.75C10.5511 14 10.3603 13.921 10.2197 13.7803C10.079 13.6397 10 13.4489 10 13.25C10 13.0511 10.079 12.8603 10.2197 12.7197C10.3603 12.579 10.5511 12.5 10.75 12.5H12.5V10.5H4.5C4.30308 10.5 4.11056 10.5582 3.94657 10.6672C3.78257 10.7762 3.65442 10.9312 3.57816 11.1128C3.50191 11.2943 3.48096 11.4943 3.51793 11.6878C3.5549 11.8812 3.64816 12.0594 3.786 12.2C3.92524 12.3422 4.0023 12.5338 4.00024 12.7328C3.99818 12.9318 3.91716 13.1218 3.775 13.261C3.63285 13.4002 3.4412 13.4773 3.24222 13.4752C3.04325 13.4732 2.85324 13.3922 2.714 13.25C2.25571 12.7829 1.99929 12.1544 2 11.5V2.5ZM12.5 1.5V9H4.5C4.144 9 3.806 9.074 3.5 9.208V2.5C3.5 2.23478 3.60536 1.98043 3.79289 1.79289C3.98043 1.60536 4.23478 1.5 4.5 1.5H12.5ZM5 12.25V15.5C5 15.5464 5.01293 15.5919 5.03734 15.6314C5.06175 15.6709 5.09667 15.7028 5.1382 15.7236C5.17972 15.7444 5.22621 15.7532 5.27245 15.749C5.31869 15.7448 5.36286 15.7279 5.4 15.7L6.85 14.613C6.89328 14.5805 6.94591 14.563 7 14.563C7.05409 14.563 7.10673 14.5805 7.15 14.613L8.6 15.7C8.63714 15.7279 8.68131 15.7448 8.72755 15.749C8.77379 15.7532 8.82028 15.7444 8.8618 15.7236C8.90333 15.7028 8.93826 15.6709 8.96266 15.6314C8.98707 15.5919 9 15.5464 9 15.5V12.25C9 12.1837 8.97366 12.1201 8.92678 12.0732C8.87989 12.0263 8.81631 12 8.75 12H5.25C5.1837 12 5.12011 12.0263 5.07322 12.0732C5.02634 12.1201 5 12.1837 5 12.25Z"/></svg>'
使用:
1{< github
2    name="链接标题"
3    link="https://链接本体"
4    description="链接内容描述"
5    color="#小圆点颜色"
6    language="可以当标签用?"//实际使用需要双括号
7>}
🔟 标签快样式
Warning:需要双括号。
info:这是一条信息。
note:可以标注一下,但是没必要。
tip:在示例里胡说八道会使观看者会心一笑。
代码:
- html
 1<!-- /layouts/shortcodes/notice.html -->
 2
 3{{- $noticeType := .Get 0 -}}
 4
 5{{- $raw := (markdownify .Inner | chomp) -}}
 6
 7{{- $block := findRE "(?is)^<(?:address|article|aside|blockquote|canvas|dd|div|dl|dt|fieldset|figcaption|figure|footer|form|h(?:1|2|3|4|5|6)|header|hgroup|hr|li|main|nav|noscript|ol|output|p|pre|section|table|tfoot|ul|video)\\b" $raw 1 -}}
 8
 9{{ $icon := (replace (index $.Site.Data.SVG $noticeType) "icon" "icon notice-icon") }}
10<div class="notice {{ $noticeType }}" {{ if len .Params | eq 2 }} id="{{ .Get 1 }}" {{ end }}>
11    <div class="notice-title">{{ $icon | safeHTML }}</div>
12    {{- if or $block (not $raw) }}{{ $raw }}{{ else }}<p>{{ $raw }}</p>{{ end -}}
13</div>
- css
 1#assets\scss\custom.scss
 2//增加notice短代码
 3.notice {
 4  position:relative;
 5  padding: 1em 1em 1em 2.5em;
 6  margin-bottom: 1em;
 7  border-radius: 4px;
 8  p:last-child {
 9      margin-bottom: 0;
10  }
11  .notice-title {
12      position: absolute;
13      left: 0.8em;
14      .notice-icon {
15          width: 1.2em;
16          height: 1.2em;
17      }
18  }
19  &.notice-warning {
20      background: hsla(0, 65%, 65%, 0.15);
21      border-left: 5px solid hsl(0, 65%, 65%);
22      .notice-title {
23          color: hsl(0, 65%, 65%);
24      }
25  }
26  &.notice-info {
27      background: hsla(30, 80%, 70%, 0.15);
28      border-left: 5px solid hsl(30, 80%, 70%);
29      .notice-title {
30          color: hsl(30, 80%, 70%);
31      }
32  }
33  &.notice-note {
34      background: hsla(200, 65%, 65%, 0.15);
35      border-left: 5px solid hsl(200, 65%, 65%);
36      .notice-title {
37          color: hsl(200, 65%, 65%);
38      }
39  }
40  &.notice-tip {
41      background: hsla(140, 65%, 65%, 0.15);
42      border-left: 5px solid hsl(140, 65%, 65%);
43      .notice-title {
44          color: hsl(140, 65%, 65%);
45      }
46  }
47}
48
49[data-theme="dark"] .notice {
50  &.notice-warning {
51      background: hsla(0, 25%, 35%, 0.15);
52      border-left: 5px solid hsl(0, 25%, 35%);
53      .notice-title {
54          color: rgba(224, 108, 108, 0.5);
55      }
56  }
57  &.notice-info {
58      background: hsla(30, 25%, 35%, 0.15);
59      border-left: 5px solid hsl(30, 25%, 35%);
60      .notice-title {
61          color: rgba(240, 178, 117, 0.5);
62      }
63  }
64  &.notice-note {
65      background: hsla(200, 25%, 35%, 0.15);
66      border-left: 5px solid hsl(200, 25%, 35%);
67      .notice-title {
68          color: rgba(108, 185, 224, 0.5);
69      }
70  }
71  &.notice-tip {
72      background: hsla(140, 25%, 35%, 0.15);
73      border-left: 5px solid hsl(140, 25%, 35%);
74      .notice-title {
75          color: rgba(108, 224, 147, 0.5);
76      }
77  }
78}
图标:
1# data\SVG.toml
2# Notice Icon
3notice-warning = '<svg xmlns="http://www.w3.org/2000/svg" class="icon" viewBox="0 0 576 512" fill="hsl(0, 65%, 65%)"><path d="M256 8C119 8 8 119 8 256s111 248 248 248 248-111 248-248S393 8 256 8zM124 296c-6.6.0-12-5.4-12-12v-56c0-6.6 5.4-12 12-12h264c6.6.0 12 5.4 12 12v56c0 6.6-5.4 12-12 12H124z"/></svg>'
4notice-info = '<svg xmlns="http://www.w3.org/2000/svg" class="icon" viewBox="0 0 512 512" fill="hsl(30, 80%, 70%)"><path d="M256 8a248 248 0 100 496 248 248 0 000-496zm0 110a42 42 0 110 84 42 42 0 010-84zm56 254c0 7-5 12-12 12h-88c-7 0-12-5-12-12v-24c0-7 5-12 12-12h12v-64h-12c-7 0-12-5-12-12v-24c0-7 5-12 12-12h64c7 0 12 5 12 12v100h12c7 0 12 5 12 12v24z"/></svg>'
5notice-note = '<svg xmlns="http://www.w3.org/2000/svg" class="icon" viewBox="0 0 512 512" fill="hsl(200, 65%, 65%)"><path d="M504 256a248 248 0 11-496 0 248 248 0 01496 0zm-248 50a46 46 0 100 92 46 46 0 000-92zm-44-165l8 136c0 6 5 11 12 11h48c7 0 12-5 12-11l8-136c0-7-5-13-12-13h-64c-7 0-12 6-12 13z"/></svg>'
6notice-tip = '<svg xmlns="http://www.w3.org/2000/svg" class="icon" viewBox="0 0 512 512" fill="hsl(140, 65%, 65%)"><path d="M504 256a248 248 0 11-496 0 248 248 0 01496 0zM227 387l184-184c7-6 7-16 0-22l-22-23c-7-6-17-6-23 0L216 308l-70-70c-6-6-16-6-23 0l-22 23c-7 6-7 16 0 22l104 104c6 7 16 7 22 0z"/></svg>'
使用:
 1{< notice notice-warning >}
 2Warning:需要双括号。
 3{< /notice >}
 4
 5{< notice notice-info >}
 6info:这是一条信息。
 7{< /notice >}
 8
 9{< notice notice-note >}
10note:可以标注一下,但是没必要。
11{< /notice >}
12
13{< notice notice-tip >}
14tip:在示例里胡说八道会使观看者会心一笑。
15{< /notice >}